Pages

vendredi 30 mars 2012

INVENTORY CHALLENGE no. 75, Easter + animal


Happy Friday Friends,
Welcome to our 75th Inventory Challenge, featuring Easter + animal. I have loved  Tilda as Shepard, from the Hoppy Easter collection, 2010,  for so long and was waiting for this special time of the year to color her. She is soo pretty in her little purple dress.  I have stamped her on xpress blending card, colored with copics, and all the shading is done with colored pencil. I love mixing both medium, the warmth of the pencils' pigment mixed with the cold ink of the copics gives a balance, an harmony that I love very much. I was inspired by the wonderful sketch at  CLP Challenge blog, after seeing the lovely creation by my sweet friend Elise.

Bon vendredi, chères amies.
Bienvenue à notre 75e Inventory Challenge, ayant pour thème Pâques + un animal. J'aime  Tilda as Shepard depuis longtemps, mais je n'avais pas eu la chance de la colorier, alors voici l'occasion parfaite. Elle est de la collection Hoppy Easter, 2010. Elle est tellement jolie dans sa petite robe violet. Je l'ai étampée sur x-press blending card, coloriée aux Copics, avec les ombres faites aux crayons de bois. J,adore mélanger le pigment froid de l'encre du copic et la chaleur du crayon de bois, un équilibre parfait. Je me suis inspirée du magnifique sketch de CLP Challenge blog, après avoir visité ma chère amie Elise


Here is my card: 
Voici ma carte.


The beautiful papers are from Pion Design, Fairytale collection of spring, Violet; cardstocks from Bazzil and flowers (available from Scrapbook ta vie); the awesome leaves are a die cut from Marianne (LR0156).  I stamped the beautiful Stempleglede Vintage garden stamp around my image with Dazzle versamark, and embossed with clear powder; then, I inked with Tea dye and Milled Lavender Distress Inks. I added stickles to tilda's crinoline, on the little butterflies, and the little dots are made with perfect pearl.

Mes papiers sont de la magnifique collection Fairy tale of spring, de Pion design; mes cartons Bazzil et mes fleurs (disponibles Scrapbook ta vie); j'ai étalé des stickles sur les fleurs, j'adore ce petit détail brillant. Les magnifiques feuilles sont une découpe de Marianne (LR0156). J'ai utilisé tout autour de l'image la magnifique étampe de Stempleglede, Vintage garden, avec du versamark Dazzle, puis j'ai encré avec Tea dye, et Milled Lavender. Sur les petits papillons ainsique sur la crinoline de Tilda, j'ai ajouté une touche de brillant avec des stickles; et les petits points sont faits avec du perfect pearl.


I wanted a little secret pocket to hide a gift card, or $$, I made this one with a tiny envelope templated found on the web. It is stamped again with milled lavender and the Vintage garden stamp. 
J'aime ajouter une petite pochette secrete pour insérer de l'argent ou une carte cadeau, celle ci est faite à partir d'un modèle trouvé sur le web. Je l'ai étampé à nouveau avec Milled lavender et l'étampe de coin de Stempleglede. 


I had no more paper to complete the other side, so I stamped and embossed the border of a very vanilla cardstock, inked with Tea dye and Milled lavender. I used the scraps to make a little slider, under which  a nice tag, (cut with Mariane die LR0154 from STV) to write wishes. The border lace is made with a MS punch.
Il ne me restait plus que 2 petites retailles de papiers pour compléter cette dernière page de ma carte. Alors, j'ai imprimé et embossé la même étampe, sur un carton très vanille de SU; que j'ai encré avec Tea dye et Milled lavender.  Au moyen d'un poinçon MS, j'ai découpé la dentelle sur le carton ou j'ai collé la retaille de papier, par dessus, j'ai fait un petit rectangle sous lequel je glisse la jolie étiquette de Marianne (LR0156) (disponible chez Scrapbook ta vie) où on peut écrire nos souhaits.


A close up of Tilda colored with copics and shaded with pencils.
Un gros plan de Tilda coloriée aux copics et crayons de bois.


I hope you liked my card, I will be back at the beginning of the week, for my Scrapbook ta vie DT projects. 
J'espère que ma carte vous aura plus. je serai de retour en début de semaine pour vous présenter mes projets DT pour Scrapbook ta vie.

Please take a moment to hop to my friend Christina's blog and our wonderful team mates. Have a nice weekend.
Prenez un moment pour visiter le blogue de mon amie Christina ainsi que celui de nos talentueuses coéquipières.  Bonne fin de semaine.

 Sylvia 


I will enter my card in the following challenges:
 CLP challenge blog No. 45, Sketch Challenge
Just Magnolia No. 150 springtime
Paper Play challenge, week 13 Easter

vendredi 23 mars 2012

INVENTORY CHALLENGE NO. 74, The ideal couple, Tilda and Edwin


Happy Friday dear blogger friends,
Once again, Christina, our friendly team and myself, are happy to welcome you to another edition of our Inventory Challenge. This week, our theme was to reunite Tilda and Edwin on a card. I needed to color... this means the week was rough. So, I set myself for THE CHALLENGE, figuring a sidestep card for a dyslexic is quite a challenge. But as you will discover below, I made it ...LOL...in time.

Bon vendredi,
C'est à nouveau le moment de vous présenter notre défi amical, cette semaine notre défi était de réunir Tilda et Edwin sur une même carte. J,avais besoin de colorier, alors je me suis lancée dans un projet... extravaguant! Je me suis aussi mise au défi de réaliser une carte  de style "side step" que je redoute, étant dyslexique,  je fais tout à l'envers et je peine à comprendre les tutos en vis à vis...mais avec patience et persévérence, j'y suis parvenue.

 I love fairy tales, so I was well served with this new Magnolia collection.  I had this urge of coloring Medieval Tilda on her horse, so I imagine a scene where she would be riding in the country side, and Prince Edwin would wait for her, and propose... Ah!!!!!!!!!!!!  how romantic... I choose Prince Edwin with his glass shoe to accompany her. All my stamps are stamped with Versafine black onyx ink, on Strathmore Bristol Vellum papers, and colored with Faber Castel, except the magnolia tree, which is on xpress blending and colored with copics.  Hours of pleasure. Now, on to the many pictures.

J,adore les contes de fée, alors la nouvelle collection de Magnolia me comble. Je rêvais de colorier Medieval Tilda sur son cheval, alors j'ai imaginé une scène où le Prince Edwin irait à la rencontre de sa princesse qui fait une promenade à cheval  dans la campagne. Ah!!!!!!!!! quelle romance. C'est Prince Edwin with glass shoe, qui accompagne Tilda, et de l'autre côté, on distingue le chateau de Sir Edwin. toutes mes images sont étampées sur Stratmore Bristol Vellum, avec Versafine, black onyx et coloriées avec les FAber Castel, sauf l'abre Magnolia, qui est étampée sur xpress blending card, avec memento, et colorié aux copic. Des heures de plaisir!!!


A sideways view, to get the 3D effect of all the panels. I used my Cricut to cut the grass effect in different layers.
Une vue latérale, pour apprécier l'effet 3D de la carte. J,ai utilisé la cricut pour couper du gazon.

A close up of Tilda on her horse, OH! he is so much fun to color! and I used my favourite Floral Background from the Hoppy Easter collection, behind Tilda so that she seems like horse"side"riding in a country like scenery.

Ungros plan de Tilda sur son cheval. OH!! quel plaisir à colorier. J,ai aussi utilisé mon arrière plan favori, de la collection Hoppy Easter, floral Background, pour donner l'effet de campagne que je cherchais.


And a close up of Prince Edwin with glass shoe, from the Fairy Tale collection, and the wonderful Magnolia tree, in background, from the Hoppy Easter collection.

Un autre gros plan, de Edwin, cette fois, et du bel arbre à magnolia... si représentatif du printemps. j'adore ces arbres et j,ai hâte de les voir fleurir.


Please take a moment to hop at our talented team mates blogs, and admire their wonderful  creations.
Prenez un moment pour visiter les blogues de  mes compagnes et admirez leurs créations.


Sylvia


I will enter my card in the:
Just Magnolia& hAnglar Stanglar  challenge  Week No. 149, More than one fold.


vendredi 16 mars 2012

INVENTORY CHALLENGE no. 73 - you are in shape!

Happy friday,
Christina, our talented team and myself are happy to welcome you to our 73rd challenge, featuring shape cards... OMG...this challenge really took me out of my comfort zone. I am more of a square type girl, and I swear I tried a round shape card, and lost all my reference points ! and my bearings too... So, I decided to make a compromise. I used my cricut for the tea pot design card, but left the back pannel square; half of a shape card! it is a big way for me. So sorry, I did not rock that challenge at all! but still hope you will like my card.

Bon vendredi,
Christina, notre équipe et moi-même vous accueillons à notre 73e défi, ayant pour thème une carte avec une forme différente! Ce défi m'a vraiment sortie de ma zone de conform. Je suis du type "carré" et je vous jure que j,ai essayé, et j'en ai perdu tous mes repères ... et ma patience.  Alors... j'ai sortie ma cricut, et j'ai coupé un modèle de théière, mais j'ai fait une petite concession, j'ai conservé le fond carré, donc une demie "shape card". J'ai relevé la moitié du défi! mais j'espère que vous aimerez ma carte quand même.


I used the Damask Decor Cricut cartidge for my teapot. My papers are from Webster pages, Petite papers pad, Ladies & Gents and Trendsetter. My cardstock is from SU,. very vanilla and rose red. I used the SU embossing on the teapot, I inked with distress inks: Tattered Rose, Victoria Velvet and Black sooth, and inked the edges with versamark, embossed with holographic powder. Flowers and ribbon from my stash.
the cute metal embellishment is from SU, as well as all the sentiment (voeux mignons set).

J'ai utilisé la cassette Cricut Damask Decor pour tailler ma théière. Mes papiers sont de Webster Pages, Petite papers pad, Ladies & Gents and Trendsetter. Mon carton est de SU, vanille et rose rouge. J'ai utilisé le plioir SU (treillis) pour donner une texture à ma théière. Je l'ai encrée avec les Distress, tattered rose, victorian velvet et un peu de black soot. Les rebords sont embossés avec la poudre holographique. Les fleurs et le ruban sont de mon inventaire. Le joli petit cadre de métal entourant le sentiment (jeu voeux mignons) est de SU.


Inside I used a scalloped spellbinder for the writing space; the cute cup and tea bag are from Bildmalarna, the sentiment from SU (Dites-le avec des plantes set).

Pour l'intérieur, un cercle festonné (coupé avec les spellbinder) sert d,espace d'écriture, sur lequel j,ai imprimé une tasse et sac de thé, de Bilmarlarna. Le sentiment est de SU (jeu Dites-le avec des plantes).


And used a nice aqua twine from My minds eye, (available at Scrapbook ta vie) held by a cute button  to insert a gift card.
C'est une jolie corde blanche et aqua de My minds eye retenue par un joli bouton, qui sert à glisser une carte cadeau. (disponible chez Scrapbook ta vie)


thank you for visit, and please take a moment to drop by  my talented teammates.
Merci de votre visite, et, n'oubliez pas de prendre un moment et de visiter mes coéquipières.


vendredi 9 mars 2012

INVENTORY CHALLENGE nO. 72, Create a scene


Happy Friday  blogger Friends,
Christina, our talented team and myself are happy to welcome you to our 72nd Inventory Challenge, featuring a scene. this week in Montreal, we had a beautiful almost spring weather, and I saw the goose pass by, no robins yet thought, but the should be on their way. I was inspired by spring again, and associated it with shopping, and  the most romantic city in the world Paris. I had perfect elements to create a scene, and take Tilda shopping in Paris, or.. she took me. But thank God, it did not cost me a penny LOL...

Bon Vendredi,
Christina, notre équipe et moi avons le plaisir de vous accueillir à notre 72e Inventory Challenge, ayant pour thème: une scène.  Je ne sais pas si c'est la température printannière que nous avons connue ces derniers jours, mais je sentais vraiment le printemps, et je m'en suis laissée inspiré pour cette carte. qui dit printemps, dit magasinage, et quoi de mieux que  de magasiner dans Paris! eh! bien Tilda m'y a amenée en rêve! 

I love 3D, and played a lot with it on this card. I used the Eiffel tower from Make it crafty, the Boutique window from Magnolia, and Tilda goes shopping, both from Bon Voyage Collection 2010.  I stamped all images on x-press blending card, with memento.  Colored with Copics. I am very proud of the sky behind the Eiffel tower. What do you think about it?

J,ai travaillé beaucoup la superposition et le 3 D dans cette carte. J,ai utilisé Tilda goes shopping, et la fenêtre de la boutique, de la collection Magnolia Bon Voyage, 2010; ma tour Eiffel est une image digi de Make it crafty. toutes imprimées sur x-press blending card, et coloriée aux copics. Je suis très fière du ciel dans l'image de la tour... je voulais des nuages très discrèts, pour ne pas nuire au thème de couleurs. qu,en pensez vous?

I used the Weathered clockdie by sizzix, that I embossed with holographic powder. My ribbon, flowers and stems are from my stash. My paper is the lovely Letters from Paris, by Wild Rose Studio, and cardstock by Bazzil (from Scrapbook ta vie) and Always artichoke, from Su.

Pour ajouter une décoration, j'ai utilisé l'horloge de Tim Holtz, que j'ai embossé avec de la poudre holographique. Mes ruban, fleurs, gerbes sont de mon inventaire. Mes papiers sont de la collection Letters from paris, de Wild rose studio, et les cartons de Bazzil, (de chez Scrapbook ta vie)

I have decorated the inside with a beautiful stamp by Harmonie called Shabby Love, (from Scrapbook ta vie) and created a little pocket, practical to insert gift cards!

J,ai décoré l'intérieur avec une magnifique étampe de Harmonie, appelée Shabby love (Scrapbook ta vie),j'en ai fait une petite pochette pour glisser une carte cadeau. 

I left enough space for writing, on this large tag, created with Tim Holtz die on which I stamped a little rose, and embossed with holographic embossing powder.
L'espace d'écriture est la super étiquette de Tim Holtz  sur lequel j'ai étampé une petite rose, embossé aussi avec la poudre holographique. J,ai encré le tour de l'étiquette avec les encres Artichaud toujours et Spun sugar.


Thank you for stopping by, please take a moment to visit my talented teammates. Have a nice weekend.
 Hugs!

Merci d'être venue me visiter, s'il vous plaît prenez un moment pour aller voir ce que mes talentueuses compagnes ont créer de beau! Passez une belle fin de semaine.


I will enter my card in the:
Stampin Scrappin Challenge central - spring / pastel

mercredi 7 mars 2012

tutoriel - comment superposer des images. TUTORIAL - how to surimpose images


You will find  an english translation below the french text.

Bon mercredi,
Je vous présente aujourd'hui un petit tutoriel d'une technique d'étampage que j,aime beaucoup: la superposition d'image, qui consiste à masquer une image déjà imprimée, pour étamper par dessus.Vous aurez besoin du matériel suivant:

Happy Wednesday,
I would like to offer you a little tutorial I have prepared within my DT projects, for Scrapbook ta vie. the original french text is on the boutique blog, but I have made an english version for you. I will give you a step by step method to print images one of top of the other, it is called the mask technique, and is one I love very much and used on the the image above. You will need the following:. 


1. Stamp a ma jig ( ou une alternative...)
1. Stamp a ma jig ( or a home made one in lego pieces)
2. une feuille de plastique transparente et assez rigide (je me sers de tapis de coupe transparent achetés chez dolorama) ( carré coupé à angle droit - très important.
2. A tranparent plastic sheet, stiff enough, and cut square (important perfect 90 degrees angles)
3. vos étampes et 2 blocs d'acrylique de grandeur appropriée
3. Your 2 stamps, acrylic bloc
4. encre approprié pour la technique de coloriage
4. Ink selected for proper coloring technique
5. carton (x-press pour les copics, ou carton à médium sec, pour les crayons de bois)
5. Coloring cardstock (x-press or cryogen for copic, or cardstock for dry medium for coloring pencils)
6. un bloc post-it de grandeur 3 X5
6. Post-it size 3 X 5, or ECLIPSE paper (which is made by judikins, and is a sticky removable paper)
7. des ciseaux, du papier collant, Scotch amovible.
7. cissors, and Scotch removable tape

Avant de poursuivre... pour celles qui n'ont pas de stamp a ma jig (qui est un positionneur d'étampe à angle droit, vous pouvez facilement vous en fabriquer un avec des blocs lego; il est important de remplir 2 conditions: un angle droit parfait, et une hauteur et longueur raisonnable pour permettre à l'étampe de s'appuyer confortablement sur ses côtés,pour ne pas bouger.)

Before going on with my explanations, I have indicated above a link where you can see how to make a stamp a ma jig, with lego. This is a tool that has a 90 degree angle, and will help position your stamp.

1. La première étape consiste à positionner vos étampes sur vos blocs d'acrylique, j'insiste sur ce point, car un coup vos étampes placées, il est important de ne plus les déplacer. Je veux créer un arrière plan pour ma Tilda, alors, je vais tout d'abord faire un essai, pour avoir une idée de l'emplacement de mes images une sur l'autre, comme dans l'image qui suit.

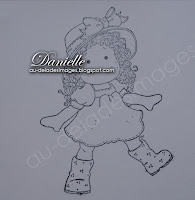
1. the first step consists in positioning your stamps on acrylic blog, I am insisting on this point, so you do not move your stamps once they are positioned on the block. To see what kind of scenery I want to create, I stamp both images one on top of the other, to have an idea of the place each stamp will occupy on my cardstock. refer to the picture below.


2. Puis, je vais imprimer l'image que je souhaite entière, donc au premier plan, sur le post it, en prenant soin de garder le plus d'espace de colle possible. Ici, ce sera Tilda, et je la positionne le plus possible près de la bordure collante. Puis je découpe tout autour de l'image, le plus près possible des lignes. réservez, ceci est un masque.

2. I will stamp the image I want complet on the the post it, in this case, it is tilda, making sure I will keep the most sticky part. (If you use the Eclipse tape, you will not need to worry). then, I cut all around Tilda, close to the lines. This will be my mask.


3. Ensuite, je vais imprimer mon image d'arrière plan sur ma feuille de plastique au moyen du positinneur, tel que démontré ci dessous, en prenant soin de la positionner, à l'angle de  mon stamp a ma jig, j'obtiens ainsi mon image de fonds en transparence.

3. I will then print the back ground image on my plastic sheet using the stamp a ma jig. As shown below. I will get my background image, in trasparency, making it easy to position on my final print.


4.Tous mes éléments sont maintenant prêts pour imprimer mon image en version finale. Ce qu'il faut se rappeler, c'est de procéder selon les règles de perspective, imprimer le premier plan,

4. All my elements are now ready, to start printing my final version. What has to be remembered, is to proceed according to perspective rules ( print the closest image first, and then go on...)

                                                    
 puis protéger cette image, tel que montré sur la photo  ci haut, au moyen du post it que nous avons préalablement imprimé et coupé.

After printing Tilda, as seen on the above picture, cover her with the post it.

     
L,étape suivante consiste à postionner l'image de fond, imprimée sur la feuille transparente, à l'endroit désiré. Avant de se faire, un petit truc, pour éviter que notre image se déplace, je colle un coin au moyen d'un ruban collant AMOVIBLE (c'est le Scotch dont le distributeur est de couleur bleu)

We will now position the background image on top of tilda (which should have been covered with the mask). To make sure the image does not move, stick a tiny piece of stoch tape at the coner of the carstock. 


Maintenant, positionner le Stamp a ma jig au coin de la feuille de platique, puis retirez la, sans bouger le positionneur. retirez la feuille de plastique, et replacez la par le bloc d'acriclique sur lequel est placé l'étampe de fond.

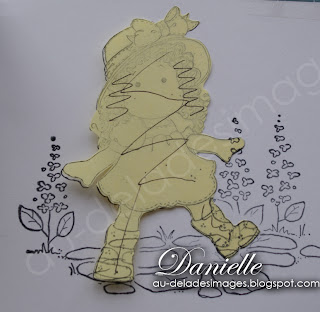
When you are satisfied with the emplacement of the background image, postion the stamp a magic as seen below, at the corner of the plastic sheet. Then, remove the plastic sheet, and simply position the acrylic bock at the right corner, and stamp the image.


Voilà... sur cette photo, vous pouvez voir où l'étampe a imprimé sur les bottes de tilda et sur sa main.

On the picture below, you can see where the background image overlaps on tilda.


5. Enlevez le post it, et vous êtes maintenant prête à colorier votre image.
5. Remove the post it, and you are now ready to color the image.


6. Si vous aviez voulu imprimer une autre image en superpostion, au 3e plan, il aurait suffit de masquer Tilda, ainsi que  la 2e image, et d'imprimer votre 3e image sur une feuille transparente, et de répéter les étapes.

6. You could have printed a 3rd image, behind tilda and the first background. All you would have to do is make a 2nd mask for the flower background, and stamp the 3rd image over all the masks.


Voici mon image coloriée.
this is my colored image.


Et la carte sur laquelle je l'ai utilisée.
And the card on which I used it.


 J,espère que cette petite technique vous a plu, et que vous tenterez l'expérience dans vos prochaines créations. A bientôt.

I hope you enjoyed this little tutorial, and it will make it easier for you to experiment this little technique.


vendredi 2 mars 2012

INVENTORY CHALLENGE NO. 71, Inspired by spring


Happy Friday dear Friends,                    (la traduction française suit le texte anglais)
If I truly want to be inspired by spring, I cannot look out the window this morning, we had a snowstorm yesterday that left us with 6 inches of this white stuff on the ground!  Christina, our team and I are very happy to welcome you to our 71st Inventory Challenge, featuring SPRING.
Bon vendredi, chères amies,
Je n'ai pu chercher inspiration du printemps en regardant par la fenêtre ce matin, nous avons eu une petite tempête hier qui nous a laissé un tapis blanc de quelque 6 pouces. Christina, notre équipe et moi même, vous accueuillons ce matin, à notre 71e défi, sur le printemps!


 For my card, I chose images from the Butterfly dream collection of last year, Tilda with rubber boots, and stone pathway. My images were stamped on Cryogen white, using the mask technique, which will be my monthly tutorial for Scrapbook ta vie... OMG, as much as I love this paper, I had been using X-pressblending card lately, and had quite a surprise when I colored my images. It is true to say that copics do not react the same on both papers... I am not totally satisfied with Tilda's curly hair, but this is it. I also had to practice shading with prismacolor, I was totally surprised at how different the pencils react on different papers... the pleasures of Experiencing! Enough of my bla bla, on to my card.

J,ai choisi pour ma carte les étampes de la collection magnolia  Butterfly dream de 2011, notamment Tilda with rubber boots, et le sentier de pierres. J'ai utilisé la technique du masque pour imprimé mes images, sur papier Cryogen white. Autant où j'adore l'effet irisé de ce papier, autant j'ai eu de la difficulté à colorier. Je ne l,avais pas employé dernièrement, et l,encre se comporte très différemment que sur le X-press blending card. Je suis un peu déçue du résultat des cheveux bouclés  de Tilda... Je voulais apporter une note de chaleur à mes copics, alors j'ai ombragé avec du prismacolor. Là aussi,  le cryogen se comporte très différement. Assez de blabla... à ma carte.


I realize I had quite a big image, and was looking for a different layout... My sweet and very talented friend Iulia, presented me with a perfect solution, a fancy fold card and a perfect layout for such a big image.thank you, dear Iulia.
Je me suis rendue compte en cours de réalisation, que mon image était très grande, et que le sketch que j,avais prévu, ne convenait justement pas. C'est en visitant  ma talentueuse et chère amie  Iulia que j'ai puisé mon inspiration, d'une carte à pli  irrégulier. Merci ma belle Iulia!


I used the magnificient PION design papers,Fairytale of spring 2011, that I received as a gift from a dear friend;  ... and had a stroke putting the scissors on the 12 X 12 sheet. I left the paper on my table, just to face the fact I would eventually have to cut them LOL...If I play with all other papers, with these ones, I take myself a bit more seriously... but there is no use leaving them in my stack.

Mes papiers sont de la collection PION Design, Fairytale of spring 2011; je les ai reçus en cadeaux d'une amie très chère et je fais une attaque chaque fois que je coupe dans ces papiers. Je les ai apprivoisés toute la semaine... les laissant sur ma table. Si je joue aisément avec le papier, je me prends plus au sérieux lorsque je mets les ciseaux dans ceux ci!

A little close up of Miss Tilda, enjoying a spring day!
Un gros plan de Mlle Tilda, qui profite d'une belle journée de printemps. 


I hope you were inspired by spring, and that you will have fun creating this weekend. Please take a moment to visit my very talented teamates, and get more inspiration.

J,espere que le printemps vous inspirera à créer des jolis projets tout au long de la fin de semaine. Je vous invite à prendre un moment et vous rendre sur les blogues de mes talentueuses co-équipières, vous y puiserez certeraiment plus d'inspiration.


Défi/challenge:


Magnolia-licious challenge blog
Deep ocean challenge, No. 20, Spring
Just magnolia - anything goes

jeudi 1 mars 2012

Défi Sketch de carte de mars, Scrapbook ta vie


voici mon 2e projet DT, celui du sketch de carte de notre Dt Hélène. J,ai choisi à nouveau de faire une carte Shaker, j'aime beaucoup l'effet de transparence, et le plaisir de jouer avec ces petits billes! J,ai choisi les magnifiques papiers de Basic Grey, Picadilly que vous retrouverez en boutique. Je les adore, ils permettent des combinaisons de couleurs et de design extraordinaires, et vont si bien avec le printemps qui s'annonce.

this is my second DT project for March. A card sketch from our DT Hélène. I decided to use the center cercle to make another shaker card. I love to play with this style of card, maintly for the transparency and the fun of seeing the little beads moving. I used the wonderful papers from Basic Grey, Picadilly, that can be found at Scrapbook ta vie. I love them so much, they offer so much possibilities. Their design and colors are just perfect for spring.


C'est Tilda qui prépare son jardin (Garden tilda de la collection Sweet Rainbow 2011), qui est représentée sur la face de ma carte, elle est étampée sur X-press blending card, coloriée aux Copic,
I chose Garden Tilda, for the front of my card, she is from the Sweet Rain bow collection 2011 for the face of my card. She was stamped on X-press blending card, and colored with copics. 


A- l'intérieur, j,ai utilisé Bird Background de la même collection, aussi coloriée aux Copic sur X-press blending card. Sur mes deux images, j'ai utilisé les Atyou spica gel pour donner un petit coup de brillant.

Inside, I used the wonderful Bird Background of the same collection, colored with copics as well. On both images, I used Atyou spica gel, to give a bit of glitter.


Mon carton brillant est de la collection Glitter silk, mon ruban de Stampin up, mes fleurs et papillons de mon inventaire, la magnifique rose centrale, est de Prima.  J'ai coloré des feuilles blanches avec les encres distress, Rusty Hinge et Peeled Paint, que j,ai aussi utilisé autour de mes papiers.

Si vous désirez participer, c'est ICI, pour tous les renseignements.

My glitter cardstock is from glitter silk, my ribbon from Stampin Up, flowers and butterflies are from my stash. The wonderful central rose, is from Prima. I colored the nice white silk leaves with Distress inks, in rusty hinge, and Peeled Paint, that I also used to stain the border of my papers.

If you would like to participate, click HERE.

Défi/Challenge: 
Magnolia-licious Highlites:  a project that moves and grooves (my card is a shaker card)


Défi scrap couleurs de MARS - DT Scrapbook ta vie


Bon Premier jour de mars!                                (English translation follows)
Je vous présente ce matin mes projets DT, Scrapbook ta vie. Notre DT Jane nous est arrivé avec un défi couleur tout à fait dans ma palette, et permettant d'utiliser les magnifiques papiers de la collection A Boy's life, de Echo Park. ils sont encore en boutique, mais faites vite! ils s'envolent rapidement. J,ai choisi une image de Mo Manning, intitulée Brothers que j'adore, et que je rêvais de colorier depuis un bout. Elle me fait penser à mes garçons, quand ils étaient petits... douce nostalgie. L'image est imprimée sur Strathmore Bristol Vellum, coloriée avec les Faber Castel. mes cartons sont de la collection Nostalgia de Tim Holtz, et Bazzil . La corde et le bouton de Stampin Up.

Happy first of March,
I am happy to post my DT project for Scrapbook ta vie for the month of March this morning. Our DT Jane has presented us with a beautiful color theme, among my favourties. A mix of warm and cold tones. Perfect for using this cute paper palette by Echo Park, A Boy's life. I have chosen a wonderful image of Mo Manning, called Brothers that I love sooo much, it reminds me of my little boys, a looooooooong time ago, sweet nostalgia...My image is printed on Strathmore Bristol Vellum, and colored with Faber Castel. 

Voici le scrap couleur de Jane, j'espère qu'il vous inspirera!
this is Jane's Scrap couleur, I hope it will inspire you.


Et ma carte
and this is my card.


Venez participer en grand nombre. Vous trouverez toutes les informations ici.

Défi/challenge: